Thursday, August 8, 2013

My Kitchen Panty Door & Why I Did It

kitchen pantry


Do you have a spot in your house where someone can see in at night time but you can't see out if your lights are on?

Does it give you that kind of creepy feeling all over?


Well, that's what I have at my front door.  But, if I open my pantry door at just the right angle, it blocks the view into my kitchen and keeping room where I typically hang out!  So, the pantry door stays open 99.9% of the time day and night!  Sounds a little crazy, I know, but hey, whatever works!

Creepy feeling at the front door resolved - but the old view of the pantry door was, although harmless, creepier!


When I was reorganizing my Kitchen back in April, I looked at that pantry door and knew I had to change it.


I remembered that I had picked up these small jars from Hobby Lobby about a year ago after Southern Living magazine featured them with a BBQ rub recipe.   And while my awesome sisters, Pege & Cheryl made rub and labels, I on the other hand did not.

resource


The jars are just too cute with the little wooden spoons attached and they work great for small spoonfuls!


I found these free labels and was able to download and customize them for what I needed.  I didn't want adhesive labels so I printed on white card stock, cut them out and then laminated them to protect from moisture.
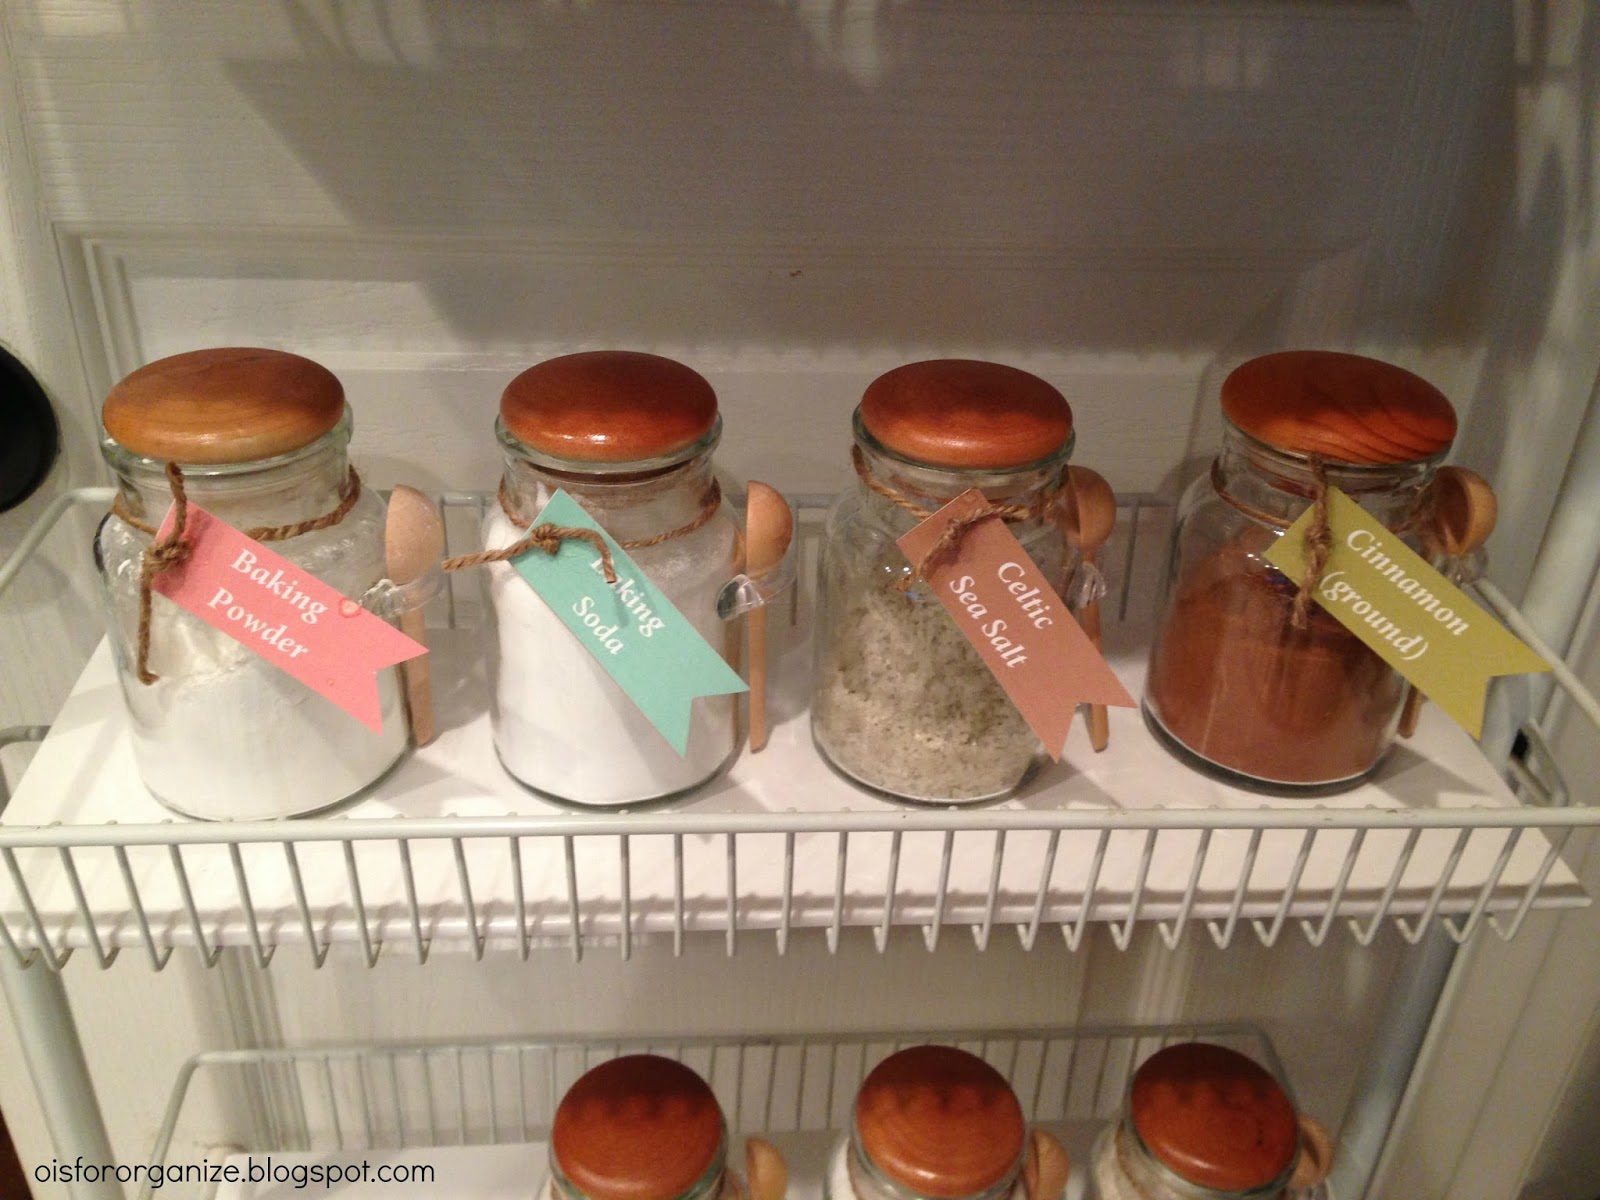


I used foam board and white contact paper and made a base for each wire shelf so the jars don't move around when the door occasionally gets opened and closed.  For the top two shelves, I used larger glass jars for items like cocoa, baking Splenda, etc.


Now when I walk past this area of my kitchen, I just smile!  No more creepies - well at least not in my pantry!


Monday, August 5, 2013

August Challenge


I hope everyone had a great weekend!


I spent the last four days down in New Orleans helping my stepdaughter, Lauren, move into her new place, which I hope to be sharing with you later this month. 

 But for now....

We should get busy on our August Challenge, which is:


(drum roll)


MASTER BEDROOM CLOSETS


As with most reorganization projects, one of the first things you will want to do is...

wait for it....

                                   wait for it....

                                                                       you guessed it...


PURGE

Don't you just love that word!  As an organizer, it's my numero uno favorite!

Here's how you are going to do it:


You need 4 boxes labeled:

KEEP
DONATE
TRASH
SELL

Remove articles that you know you are never going to use again and place in one of the containers other than "KEEP".

Try on your clothes!  Yup!  Go ahead...you can do it!  You know what to do with them after that, right?


    If you share a closet, you may have to twist an arm or two to complete this challenge. 

    Once you have gone through everything, you are ready to organize and place things back in the closet.

    If this is just a day or week challenge for you, then go ahead and put things back and enjoy the refreshed closet!  

    I like to use the " I B O W" method when organizing my clothes.  It just adds a little sunshine to my closet.

    For those of you that are wanting to do a bit more than purging, here are a few other things you might want to consider for this month's challenge.

    Remove everything from the closet and clean all areas of the closet.  You may want to repaint or wallpaper the walls.

    Maybe add shelves for shoes, purses, etc. that can't seem to stay off the floor.  Another option might be an over the door organizer.  If you are going to purchase new containers for storing consider clear ones.

    Becky over at Organizing Made Fun had some great tips on how to use hangers beyond clothes to organize the closet.

    resource


    One trick that I like to use when storing boots and purses, is to add paper tissue or bubble wrap to keep the items upright on a shelf or floor.

    Your closet is a place that you go to everyday at least once or twice.  Why not add a photo or something that is special to you.  There might be a spot to place an inspirational message to yourself.

    And, of course, label, label. label.

    Relax...those skinny jeans from last fall just might fit after all!

    Happy Organizing!

    Kim


    Wednesday, July 31, 2013

    Linen Closet Reveal

    I know I was MIA for the last half of the month of July and I wish I could say that I had spent ALL of my time working on my linen closet, but that would be a little white lie!

    I did however, spend some time reorganizing completely redoing my linen closet and I'm excited to share it with you today.


    linen closet reveal


    I know..... you are probably saying "Linen closet?  Where were the linens before?"

    They were spread out all over the house..

    A blanket here.... a pillow there....

    And, I actually had some linens in this closet here.... remember Boring!!


    After some serious purging, I was able to switch the two closets.  The linens that remained were moved to the "New" linen closet and the glass and decor was moved to the other closet.  Confused you yet?


    I will spend more time on this closet with of course, labels, labels, labels.


    I used to have a bunch of other towels that I needed when all of the kids were home.  They were happy to take them off my hands.  Now I have a  nice supply of white ones for guests.   

    The sheets are kept in the wicker baskets that are labeled "King" "Queen" and "Twin".  I kept one extra set of sheets for each size.  


    I find that closets tend to have a stale odor to them....not sure why....maybe because they are closed up most of the time.  Whatever the reason, I added some really wonderful scented potpourri from Z Gallery.  Now when the door is opened, it smells like the ocean.

    In the bottom of the closet is a foldable basket that I got on sale at World Market for $39!  It holds all of my blankets.


    The new linen closet makes me feel calm and relaxed, definitely not bored!

    How did your linen closet turn out?  Please send me your photos so I can share them with my blogging family!

    Who's ready for the challenge for August?


    Let's stick with closets and work on our:


    Master Bedroom Closets

    Happy Organizing!

    Kim


    Linking up to Uncommon DesignsA Bowlful of LemonsI Heart Organizingthe diy dreamer


    Monday, July 29, 2013

    Gone too Long

    Every time I finish a post on my blog, I assume that I will be back the following day.  


    and then...

    for one reason or another...

    I'm gone...

                      just like that....

                                                  for a while.

    Seriously,

    I miss all of you every day that I'm away.


    Speaking of being away....my daughter, Katie will be heading out of town in the near future and asked me for some help in finding a great makeup bag for traveling.

    As a matter of fact, she suggested that I should blog about it. So, for those of you who might get some ideas from this post today, you can thank her!

    There are a lot of choices for make up/cosmetic bags on the market that range in price, size, shape and design.

    But before you rush out the door to purchase a make up bag, there are a few tips to keeping that new bag organized and your make up essentials looking like new.  The last thing you want to do is put dirty make up and brushes in your new bag, right?


    CLEAN YOUR BRUSHES


    • Run the bristles only under lukewarm water to remove make up residue.
    • Fill a shallow bowl with warm water and a small amount of a mild shampoo and swirl the brush tips in the water.
    • Rinse the bristles and repeat until the water runs clear.
    • Wipe the brushes with a clean cloth and reshape the bristles.
    • Lay flat to dry.

    MAKE UP

    • Purge old items that you no longer use or are expired.   Here's a cheat sheet that I found here to help you with that.
    Liquid Foundation/Concealer = 6 - 12 months

    Powder Foundation, Blush, Eye Shadow = 2 years

    Mascara = 2 - 3 months

    Lipstick/Gloss = 2 years/1 year

    Lotion = 2 years

    Nail Polish = 1 - 2 years

    Perfume = 8 - 10 years 
    (who knew!)

    • Discard dirty sponges and make up pads and replace with new ones.  They carry lots of bacteria that causes breakouts!
    • Clean the outside containers/compartments well with soap and water to remove any residue.

    CHOOSE THE RIGHT BAG

    • Review all of your remaining cosmetic items and determine which ones are essential for your travels.  If you know you are only going to be using a summer palate while on your trip, don't pack fall and winter colors of lipsticks and eyeshadows.  Chances are you won't need them.
    • Make sure you consider items you always use when applying your makeup.  For example, cotton balls, q-tips, tweezers, etc.  
    • Organize them into like categories, eye shadows, foundation/concealer/powder, lipsticks/glosses/ liners, etc.
    • Decide on how you want to store them in a bag.  Do you like your brushes to have individual slots?  Maybe you like your cotton balls/pads with foundation and concealer.
    • You might like separate pouches for storing each category.  Look for bags that have clear pouches and zip.  It's always nice to be able to see what you have stored without having to open it up.
    Now you are ready to purchase your new bag.  Target has a ton of selections that I find to be very reasonably priced, ranging from $6 - $30 and provide lots of great storage space.

    Here are a few of my favorites:

    resource


    resource


    resource

    My personal favorite is Stephanie Johnson's line of travel bags that I stumbled across when I was on vacation a couple of years ago.  Her line is a bit pricier than Target but I have found them to be sturdy and they look just like they did the day I bought them.

    resource


    Whatever bag you decide on, just make sure it's right for you.  

    Have fun on your trip but please don't stay gone too long!  I'm gonna miss you!


    Happy Organizing!


    Kim

    P.S. This was my personal opinion and I was not compensated by Target or Stephanie Johnson in any way.


    Monday, July 15, 2013

    Linen Closet Storage Ideas

    While you are organizing your linen closets or storage space for July's Monthly Challenge, you may be considering using some type of baskets or containers for things like sheets, towels, table linens, etc.


    There are so many styles and colors available.


    You might even want to look around the house for unconventional items that could be used.  I think that adds so much character to an area.  


    When I was a little girl, I remember my mom teaching attempting to teach me how to fold a fitted sheet.    She always made it look so easy but when I would try to imitate her, mine never came out quite the same as hers.

    I'm a lot bigger girl now and I still can't get it to look "just like Mom's" but they do come out a little better than they used to.

    The last thing I want to have to do is open them up to see what size sheets they are and that's where  labels come in handy.


    I came across these labels from one of my favorite bloggers that can be downloaded for free.

    Here are a few others that I really liked as well.


    I found these on Amazaon for under $3.00.


    How are you going to store your linen closet items?  Let's get busy organizing!

    We are already at the halfway point for this month's challenge and I can't wait to see your transformations.

    Enjoy!

    Happy Organizing!

    Kim


    Tuesday, July 9, 2013

    A Little Mani/Pedi Organizing Project

    Sometimes I go to a nail salon and enjoy the luxury of having my nails done for me.  


    And then there are times that I like to do it myself.  

    Seriously.

    Okay. Not very often.


    nail polish storage


    I have a few supplies and nail colors that I typically use and thought I would share with you how I keep everything organized.


    I previously picked up these stackable cabinet drawers from Bed Bath & Beyond for another project but ended up having them left over and thought they would work perfectly for my nail stuff!  I try to use things that I already have around the house so that I don't have to spend any moolah!


    I used the top three sections for polish, nail tools, and scrubs and stones. 


    The bottom two sections hold cotton balls, polish removers, lotions and oils.


    Once I had everything in place, I made labels for each section.  I can't wait to park this in it's new space in my linen closet!


    Happy Organizing!

    Kim

    I was not compensated in any way from Bed Bath & Beyond.  

    Tuesday, July 2, 2013

    July's Challenge

    Linen Closets/Storage Space

    Can we say boring?


    That would be the best way I know to describe MY linen closet.  If you are feeling the same way about your's, this challenge is for you too!!

    It's one of those spaces that always ends up on the back burner I guess because it's behind closed doors!!  That can be a scary thing - what goes on behind closed doors!!


    I have two closets in my hallway, one houses my linens and the other I use to store glassware and table decorations.  The latter one is actually just outside my guest bathroom and divides the two guest rooms. I'm going to switch these two closets because it just makes a lot more sense. 


    Here is my game plan to makeover my space and hopefully, it will be helpful to you.

    Remove everything.
    Purge old items for Goodwill.
    Paint/Wallpaper walls.
    Utilize door space.
    Lighting.
    "Pretty up" the shelves.
    Baskets/Containers for odds & ends
    Labels


    Here's some great spaces I found for inspiration.

    resource
    I love what she did with her shelf edges.


    resource
    Great use of space with wire shelves.


    This closet is neat AND pretty!  The fabric on the baskets adds a nice touch as well as the crowns on the darker baskets.


    Love the use of an armoire or free standing piece of furniture for this linen space.


    This challenge should be fun and I'm hoping to see lots and lots of linen closet makeovers the first week of August!

    Let's get started!!